

Everything you need to go from zero to running your own validator on the Cosmos Hub.
Introduction
The Cosmos Hub is the flagship blockchain of the Cosmos ecosystem — the chain that powers the ATOM token. One of the most important roles in the Cosmos Hub network is that of a validator.
Validators are the backbone of the network. They propose and confirm new blocks, keep the chain secure, and in return, earn staking rewards. If you’ve ever wondered how to run your own validator and participate in securing one of the most important blockchains in crypto, you’re in the right place.
This guide will walk you through everything from scratch — what a validator is, what hardware you need, and exactly how to set one up step by step.
What Is a Validator?
Think of validators like the “miners” of the Cosmos Hub — but instead of solving complex math problems (Proof of Work), Cosmos uses Delegated Proof of Stake (DPoS).
Here’s how it works:
- ATOM holders stake (lock up) their tokens to validators they trust.
- Validators with more stake have a higher chance of being selected to propose new blocks.
- Both validators and their delegators earn staking rewards (typically 15–20% APR).
- If a validator misbehaves (double-signing, long downtime), they get slashed — meaning they lose a portion of their staked ATOM.
The Cosmos Hub has 180 active validators at any given time. If you’re outside the top 180 by stake, you’re in the inactive set and don’t earn rewards.
Prerequisites — What You’ll Need
Before we start, make sure you have:
- Basic Linux command line knowledge (navigating directories, editing files)
- A server or VPS you can SSH into
- Some ATOM tokens to self-delegate (minimum ~1 ATOM to create a validator, but realistically much more to stay in the active set)
- Time and patience — this is a multi-step process
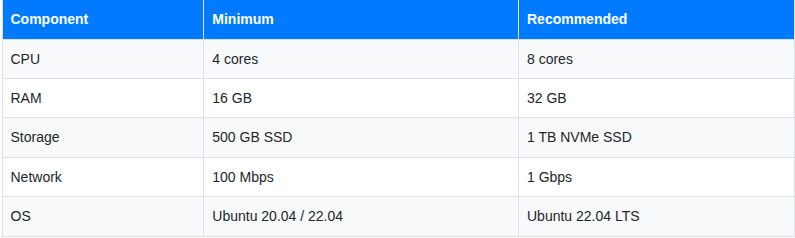
Step 1: Choose Your Hardware
Running a validator is serious business. If your node goes down for too long, you get jailed (temporarily kicked out of the active set). If you double-sign, you lose 5% of your stake permanently.
Minimum recommended specs:
Where to host your validator:
- Hetzner — Popular among validators, affordable bare metal
- OVH — Good EU-based option
- AWS / GCP / Azure — More expensive but reliable (avoid single-cloud dependency)
- Your own hardware — Ideal for true decentralization, but requires stable internet and power
⚠️ Pro Tip: Never run your validator on a home connection without a UPS and redundant internet. One power cut = downtime = jailing.
Step 2: Set Up Your Server
SSH into your fresh Ubuntu server and run the following to update packages and install dependencies:
sudo apt update && sudo apt upgrade -y
sudo apt install -y build-essential git curl wget jq
Step 3: Install Go
The Cosmos Hub software (gaiad) is written in Go. Install Go 1.21+:
# Download Go
wget https://go.dev/dl/go1.21.6.linux-amd64.tar.gz
# Extract and install
sudo rm -rf /usr/local/go
sudo tar -C /usr/local -xzf go1.21.6.linux-amd64.tar.gz
# Add Go to your PATH
echo "export PATH=$PATH:/usr/local/go/bin:$HOME/go/bin" >> ~/.bashrc
source ~/.bashrc
# Verify installation
go version
You should see something like: go version go1.21.6 linux/amd64
Step 4: Install gaiad (Cosmos Hub Daemon)
gaiad is the official Cosmos Hub software. Let's build it from source:
# Clone the official repo
git clone https://github.com/cosmos/gaia.git
cd gaia
# Checkout the latest stable release
# Check https://github.com/cosmos/gaia/releases for the latest tag
git checkout v17.2.0
# Build and install
make install
# Verify installation
gaiad version
Step 5: Initialize Your Node
Now we set up the node’s configuration:
# Replace "MyValidator" with your actual validator name
gaiad init MyValidator --chain-id cosmoshub-4
# This creates ~/.gaia/ with config files
Step 6: Download the Genesis File
The genesis file defines the initial state of the blockchain. Every node on Cosmos Hub needs the same genesis file:
curl -o ~/.gaia/config/genesis.json \
  https://raw.githubusercontent.com/cosmos/mainnet/master/genesis/genesis.cosmoshub-4.json
Verify it downloaded correctly:
sha256sum ~/.gaia/config/genesis.json
Step 7: Configure Seeds and Peers
Edit your ~/.gaia/config/config.toml to add seed nodes so your node can find peers to connect to:
nano ~/.gaia/config/config.toml
Find the seeds line and add official Cosmos Hub seeds:
seeds = "ade4d8bc8cbe014af6ebdf3cb7b1e9ad36f412c0@seeds.polkachu.com:14956"
Step 8: Set Minimum Gas Price
In ~/.gaia/config/app.toml, set the minimum gas price to prevent spam:
nano ~/.gaia/config/app.toml
Find and update:
minimum-gas-prices = "0.005uatom"
Step 9: Configure Pruning (Save Disk Space)
Still in app.toml, configure pruning to save disk space:
pruning = "custom"
pruning-keep-recent = "100"
pruning-interval = "10"
Step 10: Run Your Node as a System Service
Create a systemd service so gaiad starts automatically and restarts if it crashes:
sudo nano /etc/systemd/system/gaiad.service
Paste the following (replace ubuntu with your actual username):
[Unit]
Description=Gaia Node
After=network-online.target
[Service]
User=ubuntu
ExecStart=/home/ubuntu/go/bin/gaiad start
Restart=always
RestartSec=3
LimitNOFILE=65535
[Install]
WantedBy=multi-user.targe
Enable and start the service:
sudo systemctl daemon-reload
sudo systemctl enable gaiad
sudo systemctl start gaiad
Check if it’s running:
sudo journalctl -u gaiad -f
Step 11: Sync Your Node
Your node now needs to sync with the blockchain — downloading and verifying all past blocks. This can take days on a fresh install.
Speed it up with State Sync or Snapshots:
The fastest way is to use a snapshot from a trusted provider:
Follow their instructions to restore the snapshot into ~/.gaia/data/.
Check your sync status anytime with:
gaiad status | jq '.SyncInfo'
Wait until "catching_up": false — your node is fully synced!
Step 12: Create Your Validator Wallet
Now create a wallet to hold your ATOM for staking:
gaiad keys add my-validator-wallet
CRITICAL: Back up the mnemonic phrase that appears. Losing this = losing access to your funds. Store it offline, never in a cloud document.
Get your wallet address:
gaiad keys show my-validator-wallet -a
Fund this address with some ATOM (you need at least enough to self-delegate + pay gas fees).
Step 13: Create Your Validator
Once your node is fully synced and your wallet is funded, it’s time to officially create the validator:
gaiad tx staking create-validator \
  --amount=1000000uatom \          # Amount to self-delegate (1 ATOM = 1,000,000 uatom)
  --pubkey=$(gaiad tendermint show-validator) \
  --moniker="MyValidator" \        # Your validator's display name
  --chain-id=cosmoshub-4 \
  --commission-rate="0.05" \       # 5% commission on delegator rewards
  --commission-max-rate="0.20" \   # Max commission you can ever set
  --commission-max-change-rate="0.01" \ # Max daily commission change
  --min-self-delegation="1" \
  --gas="auto" \
  --gas-adjustment=1.5 \
  --gas-prices="0.005uatom" \
  --from=my-validator-wallet
Confirm the transaction and your validator is live! 🎉
Step 14: Monitor Your Validator
Keeping your validator healthy is an ongoing responsibility.
Check your validator status:
gaiad query staking validator $(gaiad keys show my-validator-wallet --bech val -a)
Useful monitoring tools:
- Mintscan — Explorer with validator rankings and uptime
- Cosmostation — Track your validator’s performance
- PANIC by Monika — Open-source alerting for validators
- Grafana + Prometheus — Set up dashboards for detailed metrics
Set up alerts for:
- Node going down
- Missed blocks
- Low disk space
- High memory usage
Important: Avoid Getting Slashed
Slashing is the biggest risk for validators. Here’s how to stay safe:

Best practices:
- Use a sentry node architecture — don’t expose your validator directly to the internet
- Never run two instances of your validator at the same time
- Set up Horcrux or TMKMS (Tendermint Key Management System) for hardware-backed signing
- Keep at least 2 weeks of runway in your wallet for gas fees
How Much Can You Earn?
Cosmos Hub staking rewards come from:
- Block rewards — Newly minted ATOM (inflation-based)
- Transaction fees — A portion of fees from all transactions
Current estimated APR for validators is around 15–20%, but this varies based on:
- Total staked ATOM in the network
- Your commission rate
- Network inflation settings (governed by ATOM holders)
Remember: you take your commission cut first, then share the rest with your delegators.
Summary
Here’s a quick recap of what we did:
- Chose appropriate hardware for running a validator
- Set up a Linux server with Go and the gaiad binary
- Initialized and configured the node
- Synced with the Cosmos Hub mainnet
- Created a wallet and funded it with ATOM
- Registered as an official validator on-chain
- Set up monitoring and learned how to avoid slashing
Running a validator is a serious commitment — it requires 24/7 uptime, active monitoring, and staying up to date with software upgrades. But it’s also one of the most direct ways to contribute to the security and decentralization of the Cosmos ecosystem.
Good luck, and welcome to the validator club! 🚀
Have questions? Drop them in the comments below. If this guide helped you, consider delegating some ATOM to support independent validators like us.
How to Set Up a Cosmos Hub (ATOM) Validator Node — A Beginner’s Guide was originally published in Vitwit on Medium, where people are continuing the conversation by highlighting and responding to this story.