Your validator key is only as safe as the server it runs on — Ubuntu 24.04 edition
Why Server Hardening Is Part of Validator Security
Most validator security conversations jump straight to key management — HSMs, remote signers, Horcrux. Important, yes. But none of it matters if someone can SSH into your box because you left port 22 open to the world with password auth enabled.
Your validator server is a high-value target. It’s publicly known to be running infrastructure that controls staked funds and signs blocks. Bots scan the entire IPv4 range constantly looking for exactly this kind of exposure. Server hardening isn’t a “nice to have” layer — it’s the perimeter that everything else depends on.
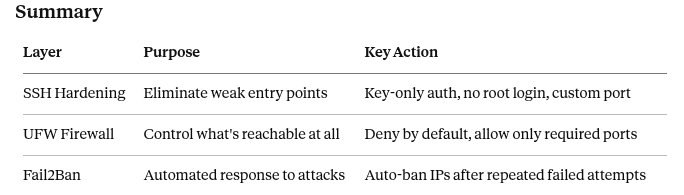
This guide covers three pillars on Ubuntu 24.04: SSH hardening, firewall configuration (UFW), and Fail2Ban for automated intrusion prevention.
Part 1: SSH Hardening
Step 1 — Create a Non-Root User
If you’re still logging in as root, stop. Create a dedicated user with sudo access first.
adduser validator-ops
usermod -aG sudo validator-ops
Test that the new user can sudo before continuing — don’t lock yourself out.
su - validator-ops
sudo whoami   # should print "root"
Step 2 — Set Up SSH Key Authentication
Password authentication is the single biggest SSH attack surface. Replace it with key-based auth.
On your local machine, generate a key pair if you don’t have one:
ssh-keygen -t ed25519 -C "validator-ops-key"
Copy the public key to your server:
ssh-copy-id validator-ops@your-server-ip
Or manually, if ssh-copy-id isn't available:
cat ~/.ssh/id_ed25519.pub | ssh validator-ops@your-server-ip "mkdir -p ~/.ssh && cat >> ~/.ssh/authorized_keys"
Verify key-based login works before disabling password auth:
ssh validator-ops@your-server-ip
Step 3 — Harden sshd_config
Edit the SSH daemon config:
sudo nano /etc/ssh/sshd_config
Apply these settings:
# Disable root login entirely
PermitRootLogin no
# Disable password authentication — keys only
PasswordAuthentication no
PubkeyAuthentication yes
ChallengeResponseAuthentication no
KbdInteractiveAuthentication no
# Disable empty passwords
PermitEmptyPasswords no
# Limit login attempts per connection
MaxAuthTries 3
# Limit concurrent unauthenticated connections
MaxStartups 3:50:10
# Disable X11 forwarding (not needed on a validator server)
X11Forwarding no
# Restrict to specific user(s)
AllowUsers validator-ops
# Optional but recommended: change default port
Port 2222
On changing the SSH port: This isn’t real security — it’s “security through obscurity” — but it does dramatically cut down on automated scanner noise hitting port 22. Combine it with the other settings above, not as a replacement for them.
Restart SSH to apply:
sudo systemctl restart ssh
Critical: Keep your current SSH session open while you test the new connection in a separate terminal. If something is misconfigured, you don’t want to be locked out.
# In a NEW terminal window — test before closing your existing session
ssh -p 2222 validator-ops@your-server-ip
Step 4 — Disable Unused Authentication Methods
In the same sshd_config, also confirm these are disabled:
GSSAPIAuthentication no
HostbasedAuthentication no
IgnoreRhosts yes
Step 5 — Set an Idle Timeout
Prevent abandoned sessions from staying open indefinitely:
ClientAliveInterval 300
ClientAliveCountMax 2
This disconnects idle sessions after 10 minutes (300s × 2 checks) of inactivity.
Part 2: Firewall Configuration with UFW
UFW (Uncomplicated Firewall) ships with Ubuntu and is the simplest way to enforce strict inbound rules.
Step 1 — Set Default Policies
sudo ufw default deny incoming
sudo ufw default allow outgoing
This is the foundation: deny everything inbound by default, then explicitly allow only what’s needed.
Step 2 — Allow SSH (Your New Port)
sudo ufw allow 2222/tcp comment 'SSH'
Do this before enabling UFW — if you forget this step and enable the firewall, you’ll lock yourself out instantly.
Step 3 — Allow Validator-Specific Ports
For a typical Cosmos SDK validator, you need:
# P2P — must be open for peer connections
sudo ufw allow 26656/tcp comment 'CometBFT P2P'
# RPC — only if you need external access; otherwise keep closed or restrict by IP
# sudo ufw allow 26657/tcp comment 'CometBFT RPC'
# Metrics — restrict to your monitoring server's IP only
sudo ufw allow from YOUR_MONITORING_SERVER_IP to any port 26660 comment 'Prometheus metrics'
Never expose RPC (26657) or metrics (26660) publicly on a validator. These should either stay closed or be restricted to specific trusted IPs — your monitoring server, your own admin IP, nothing else.
If you do need RPC for a sentry node architecture, that’s a different node — not your signing validator.
Step 4 — Restrict Access by IP Where Possible
If you have a static IP or VPN, lock down SSH further:
sudo ufw delete allow 2222/tcp
sudo ufw allow from YOUR_STATIC_IP to any port 2222 proto tcp comment 'SSH - admin only'
Step 5 — Enable UFW
sudo ufw enable
Confirm your rules:
sudo ufw status verbose
Expected output should look like:
Status: active
Logging: on (low)
Default: deny (incoming), allow (outgoing), disabled (routed)
To                         Action      From
--                         ------      ----
2222/tcp                   ALLOW IN    YOUR_STATIC_IP
26656/tcp                  ALLOW IN    Anywhere
26660/tcp                  ALLOW IN    YOUR_MONITORING_SERVER_IP
Step 6 — Enable Logging
sudo ufw logging on
Logs go to /var/log/ufw.log — useful for spotting reconnaissance attempts later.
Part 3: Fail2Ban — Automated Intrusion Prevention
UFW blocks based on static rules. Fail2Ban adds a dynamic layer — it watches logs in real time and automatically bans IPs showing malicious behavior, like repeated failed SSH logins.
Step 1 — Install Fail2Ban
sudo apt update
sudo apt install fail2ban -y
Step 2 — Create a Local Config Override
Never edit jail.conf directly — it gets overwritten on updates. Create a local override instead:
sudo cp /etc/fail2ban/jail.conf /etc/fail2ban/jail.local
sudo nano /etc/fail2ban/jail.local
Step 3 — Configure the SSH Jail
Find the [sshd] section (or add it) and configure:
[sshd]
enabled = true
port = 2222
filter = sshd
logpath = /var/log/auth.log
maxretry = 3
findtime = 600
bantime = 3600
What this means:
- maxretry = 3 — ban after 3 failed attempts
- findtime = 600 — within a 10-minute window
- bantime = 3600 — ban for 1 hour
For a validator server, consider being more aggressive:
[sshd]
enabled = true
port = 2222
filter = sshd
logpath = /var/log/auth.log
maxretry = 3
findtime = 600
bantime = 86400
Bumping bantime to 86400 (24 hours) discourages persistent scanners without permanently blacklisting legitimate users who fat-finger a password once.
Step 4 — Set Global Defaults
In the [DEFAULT] section of jail.local:
[DEFAULT]
bantime = 3600
findtime = 600
maxretry = 5
backend = systemd
destemail = your-email@example.com
sendername = Fail2Ban-Validator
action = %(action_mwl)s
action_mwl sends an email with logs when a ban occurs — useful if you want notifications, though most validator operators route this through their existing Telegram/Prometheus alerting instead.
Step 5 — Enable and Start Fail2Ban
sudo systemctl enable fail2ban
sudo systemctl start fail2ban
Step 6 — Verify It’s Working
sudo fail2ban-client status
sudo fail2ban-client status sshd
Expected output:
Status for the jail: sshd
|- Filter
|  |- Currently failed: 0
|  |- Total failed:     12
|  `- Journal matches:  _SYSTEMD_UNIT=ssh.service + _COMM=sshd
`- Actions
   |- Currently banned: 1
   |- Total banned:     4
   `- Banned IP list:   203.0.113.45
Step 7 — Manage Bans Manually if Needed
# Unban an IP (e.g., if you accidentally banned yourself)
sudo fail2ban-client set sshd unbanip YOUR_IP
# Manually ban an IP
sudo fail2ban-client set sshd banip SUSPICIOUS_IP
# Check ban list
sudo fail2ban-client get sshd banip
Bonus: Extend Fail2Ban to UFW
By default, Fail2Ban uses iptables directly. You can configure it to work alongside UFW more cleanly:
[DEFAULT]
banaction = ufw
This makes Fail2Ban add its bans as UFW rules, keeping your firewall state consistent and easier to audit in one place (sudo ufw status).
Putting It All Together: Verification Checklist
After completing all three sections, verify your setup end-to-end.
SSH:
# Confirm root login is disabled
ssh root@your-server-ip   # should be refused
# Confirm password auth is disabled
ssh -o PubkeyAuthentication=no validator-ops@your-server-ip -p 2222   # should fail
# Confirm key-based login works
ssh -p 2222 validator-ops@your-server-ip   # should succeed
Firewall:
sudo ufw status verbose
# Confirm only intended ports are open
Fail2Ban:
sudo fail2ban-client status sshd
# Confirm jail is active and monitoring
Common Mistakes to Avoid
Locking yourself out Always test new SSH settings in a second terminal before closing your original session. If you’re on a cloud provider, also check if they offer a console/VNC access option as a fallback.
Forgetting to allow SSH before enabling UFW sudo ufw enable without an SSH allow rule in place first means an instant lockout if you're connected remotely.
Exposing RPC or metrics ports publicly These are commonly left open by default during initial node setup and forgotten. Audit your UFW rules periodically — sudo ufw status numbered.
Using the same SSH key across multiple critical servers If one server’s key is compromised, you don’t want that to compromise your validator too. Use dedicated keys per environment.
Not testing Fail2Ban bans Run a few deliberate failed login attempts (from a non-critical IP, like a VPN) to confirm the jail actually triggers before you rely on it in production.
None of this replaces proper key management for your validator’s signing key — that’s a separate, equally critical concern. But if your server itself isn’t hardened, none of that matters. An attacker with SSH access has access to everything else on the box too.
Treat your validator server like the high-value target it is, because it already looks like one to everyone scanning the internet.
Hardening Your Validator Server: SSH, Firewalls & Fail2Ban was originally published in Vitwit on Medium, where people are continuing the conversation by highlighting and responding to this story.